AWS Apigateway strategy for Microservices
Today’s modern architectures are increasingly microservices-based, with domain specific engineering teams, working independently on a service with their own feature requirements and deployment pipelines. The benefits of this approach are numerous, some to highlight are increased agility, release velocity and scalability.
Microservice architectures also come with some challenges, particularly when the domains are complex and there are lot of domains, corresponding api’s and interactions. To tackle this we need to follow strong engineering and architecture principles, at the same time setting up repeatable and discoverable patterns/api’s.
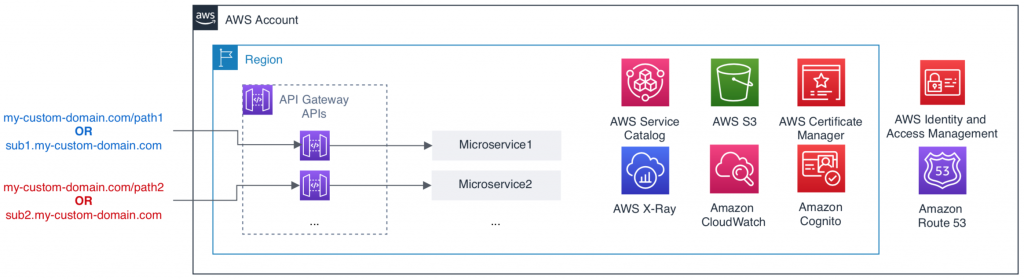
Highlevel API Strategy is depicted below
AWS Services leveraged..
- Amazon Apigateway
- Amazon Certificate Manager
- Amazon Route 53
- Amazon S3
- AWS Cloudformation
Tools and technologies to have knowledge of..
- Node, npm
- serverless and it’s plugins.
- Jenkins pipelines or other CI/CD schemes
Expectation is you have a serverless based rest microservice/s and are trying to migrate your API resource strategy.
Details about the strategy
- Introduction of a custom domain the names are predictability and discoverability of api’s is easy.
- Instead of having 1 api gateway per environment (ex:
root-api-dev), we will continue to create an api per domain. (ex:domain-api). - All the configurations around custom domain are complete and there is no need for individual team to pursue it.
- For our usecase lets consider we are trying to set up dev and non-prod environments as part of a single aws account.
Microservices, their fronting API Gateway APIs, and supporting services are in the same AWS account. This account also includes core AWS services such as the following:
- Route 53 for domain name registration and DNS
- ACM for managing server certificates for your domain
- Custom authentication and user management
- serverless IaaC approach.
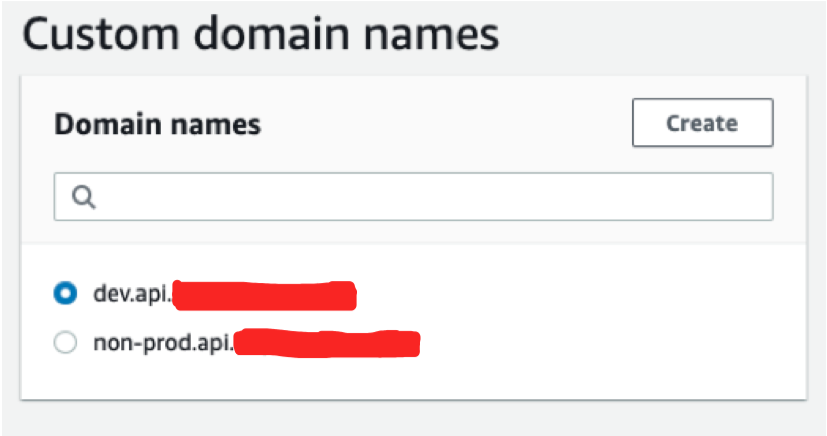
Custom domains
Following 2 custom domains need to be provisioned and configured.
- dev.api.example.com (np account)
- non-prod.api.example.com (np account)
You can achieve above in 2 ways…
- Create the Custom domain manually using AWS console and do necessary DNS configuration or
- Let a serverless plugin, that I’m going to use later on to do the job.(ofcourse the deploy role should have required permissions.)
I prefer to use option #2.
Assuming you have multiple microservices (api’s/services) integrated with one apigateway, now let attempt to break it down.
How to leverage custom domain and migrate existing api strategy
Setting up resources
Create a domain specific apigateway
- Create
AWS::ApiGateway::RestApiresource as a separate stack and deploy it separately. - Make a folder
resources/apigatewayand place the below serverless.yml
service: <YOUR-API-NAME>-ag

provider:
  name: aws
  runtime: nodejs10.x
  stage: ${opt:stage, env:STAGE, 'local'}
  region: ${opt:region, env:REGION, 'us-east-1'}
  stackName: <YOUR-API-NAME>-apigateway
  aws_account: ${opt:aws_account, env:AWS_ACCOUNT}
  deploymentBucket: ${self:provider.region}-${self:provider.aws_account}
  role: arn:aws:iam::${self:provider.aws_account}:role/${opt:lambda_role, env:LAMBDA_ROLE}
  stackTags:
    com:owner: ${opt:owner, env:OWNER}
    com:cost-center: ${opt:cost-center, env:COST_CENTER}
    com:project: ${opt:project, env:PROJECT}
    com:env: ${opt:env, env:ENV}
    com:regulated: ${opt:regulated, env:REGULATED}
    com:data-classification: ${opt:data-classification, env:DATA_CLASSIFICATION}

resources:
  Resources:
    ApiGatewayRestApi:
      Type: 'AWS::ApiGateway::RestApi'
      Properties:
        Name: <YOUR-API-NAME>
  Outputs:
        ApiGWRestApiId:
          Value:
            Ref: ApiGatewayRestApi
          Export:
            Name: <YOUR-API-NAME>-restApiId
        ApiGWRootResourceId:
          Value:
            Fn::GetAtt:
              - ApiGatewayRestApi
              - RootResourceId
          Export:
            Name: <YOUR-API-NAME>-rootResourceId
Integrating existing api with custom domain and new apigateway
1. Install serverless-domain-manager
# From npm (recommended)
npm install serverless-domain-manager --save-dev
2. Add the plugin to root serverless.yml
plugins:
  - serverless-domain-manager
3. Add the plugin configuration for a single domain and API type to root serverless.yml
custom:
  customDomain:
    domainName: ${self:provider.stage}.api.example.com
    basePath: '<api_base_path_you_existing_root_resource_ex_payment_api>'
    certificateName: '*.api.example.com'
    stage: ${self:provider.stage}
    createRoute53Record: false
    endpointType: regional
basePath is important and that value needs to be your current root resource name.
Set createRoute53Record true if you want the plugin to create the DNS configuration, set it to false if your DNS configurations are maintained externally.
certificateName expectation is that the acm certificate is created with your domain name. In my case I created *.api.example.com so I can leverage dev.api.example.com, non-prod.api.example.com or prod.api.example.com
Ex: order-api, payment-api, product-api etc.
4. Update apiGateway configuration under provider of root serverless.yml
apiGateway:
    restApiId: ${cf:<<YOUR-API-NAME>-apigateway>.ApiGWRestApiId}
    restApiRootResourceId: ${cf:<<YOUR-API-NAME>-apigateway>.ApiGWRootResourceId}
In the above step you are mapping the rest api resource outputs created as a separate stack.
NOTE: Ideally we would use 'Fn::ImportValue' here to reference stack outputs but there is gap in serverless-domain-manager package to support it related PR, so we are leveraging ${cf: syntax to reference variables from other stack. There is a small caveat to using ${cf: though, we need to make sure this stack exists before it is referenced. In other words 'Fn::ImportValue' is lazy loading, ${cf: is eager loading. So we need to phase out our deployment twice during initial rollout, which we will discuss in next steps.
5. Modify your individual http routes.
- Ideally we would like to use one apigateway and leverage aws stages to differentiate between dev and non-prod.
- Here we will be introducing stage variable as part od routes unlike before, this is to achieve above.
- However serverless takes a different approach in leveraging aws stages and it proposes 1 apigateway per stage, which is not what we would like to utilize. Reason, considering how many domains we have we will flood apigateway with env specific, domain specific gateways. ex: payment-api-dev, payment-api-non-prod unlike payment-api with dev and non-prod stages in it.
To achieve above, go to your http function and do 2 things.
-
Removethe base resource nameex: order-api, payment-api, product-api etc.as we are configuring that as a basePath for our domain mapping. -
Replace the above, with stage name.
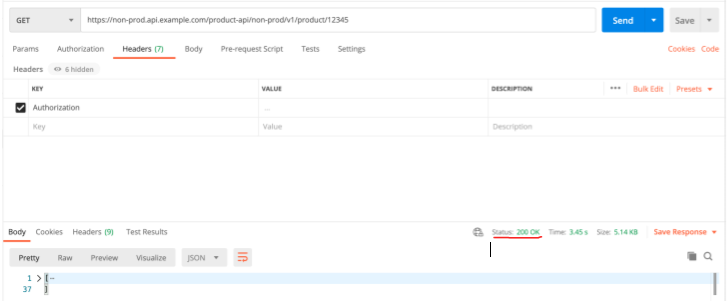
path: ${self:provider.stage}/v1/product/{productId}
This will enable us to do 2 things utilize same resources across different environments differentiated by stages. Best of both :i_love_you_hand_sign:
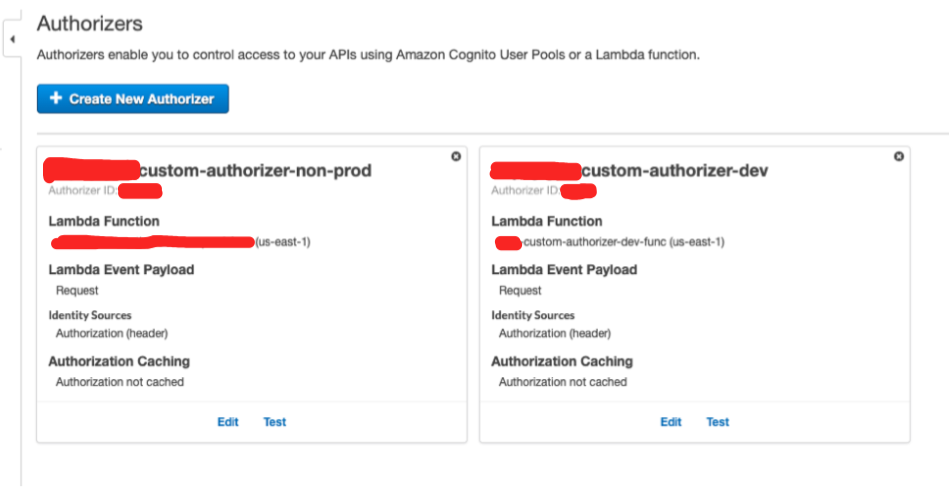
6. Since we are breaking down apigateway’s, every gateway need to have it’s own custom authorizer, specific to stage !! That is how AWS like it, so in order to achieve that you can remove any authorizer id base reference and switch to arn based mapping.(below)
authorizer:
          name: custom-authorizer-${self:provider.stage}
          type: request
          resultTtlInSeconds: 0
          arn: arn:aws:lambda:${self:provider.region}:${self:provider.aws_account}:function:custom-authorizer-${self:provider.stage}-func
When you combine both your Http mapping looks like this..
productsV1:
  handler: src/handlers/product/createProduct.handler
  memorySize: 1024
  timeout: 30
  tags:
    com:owner: ${self:custom.owner}
    com:cost-center: ${self:custom.cost-center}
    com:project: ${self:custom.project}
    com:env: ${self:custom.env}
    com:regulated: ${self:custom.regulated}
    com:data-classification: ${self:custom.data-classification}
  events:
    - http:
        method: POST
        path: ${self:provider.stage}/v1/product/{productId}
        cors: true
        authorizer:
          name: gigya-custom-authorizer-${self:provider.stage}
          type: request
          resultTtlInSeconds: 0
          arn: arn:aws:lambda:${self:provider.region}:${self:provider.aws_account}:function:custom-authorizer-${self:provider.stage}-func
At this point we completed all the necessary code changes and move to the deployment part !
Deployment
1. Go to package.json file and add following scripts to deploy an apigateway and custom domain binding respectively.
"deploy-apigateway": "(cd ./src/resources/apigateway && sls deploy)",

"create_domain": "sls create_domain",
2. Then go to the Jenkinsfile or any other pipeline, incorporate above 2 scripts to your deployment pipeline.
    sh 'npm run deploy-apigateway'
    sh 'npm run create_domain'
If you recall, earlier I mentioned about the limitation of serverless-domain-manager, it will come to haunt you if you try and deploy the gateway and dependent api at the same time, as your main stack will be referencing below and you have never provisioned deploy-apigateway before.
apiGateway:
    restApiId: ${cf:<<YOUR-API-NAME>-apigateway>.ApiGWRestApiId}
    restApiRootResourceId: ${cf:<<YOUR-API-NAME>-apigateway>.ApiGWRootResourceId}
You can tackle this different ways…
1. Deploying the stack 2 times, once commenting out above code in main serverless.yml, once the apigateway stack is created, you can un-comment and deploy again.
# apiGateway:
  #   restApiId: ${cf:payment-apigateway.ApiGWRestApiId}
  #   restApiRootResourceId: ${cf:payment-apigateway.ApiGWRootResourceId}
2. Deploy the apigateway stack separately before deploying the rest-api stack that way the ${cf: reference will resolve.
I prefer to use option #2.
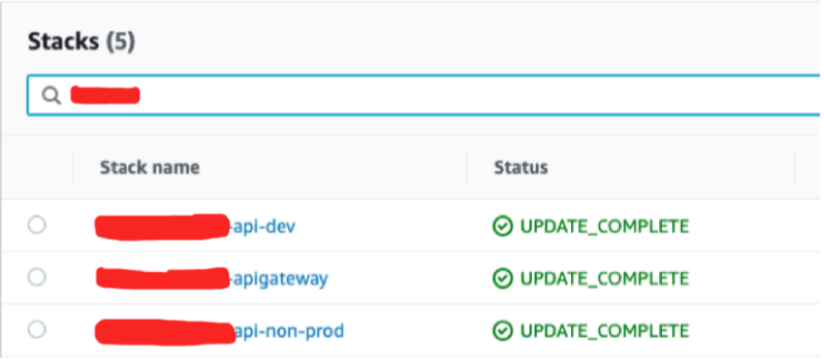
Once the deployment is complete you will see following resources per aws account:
1. Custom Domain/s
2. API Mapping under custom domains

3. Stacks
- 1 ApiGateway Stack
- 1 Rest API Stack
- Other deployment specific stacks.
4. Resources
- ApiGateway

- Stage specific api resources(in our case dev and non-prod).
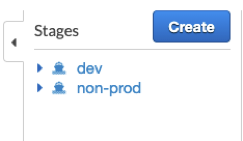
With this approch we can manage 2 env’s under 1 gateway rather than flooding with env specific api gateways
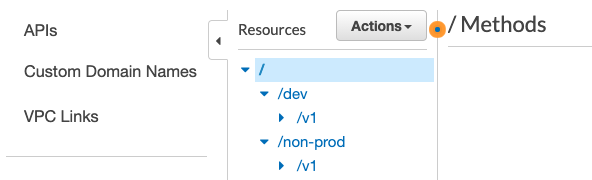
- 2 Stages (in our case dev and non-prod)
- 2 Stage specific Authorizers mapped to http functions.(these are just mappings)
Final test of your custom domain
Cheers and Happy Building 🤘